

Writing this post makes me so happy, yet also slightly frustrated. We have pretty much finished the decking in our garden, bar two planks that need to go on the side, but we ran out of wood and need to order a bit extra. I would love to be able to post the final reveal of the decking all set up how we intend to use it, however, summer seems to have been and gone. I had a really bad feeling this would happen and back in May and June when we were having that wonderful weather I kept joking that it would all change as soon as our decking was up. And apparently, I was right.
Yesterday evening as the final screw went in, I frantically checked the met office weather report for the coming week only to see that we have cloud, showers and more cloud forecast. No sign of any sun for the foreseeable future. Brilliant! But I just couldn’t wait to share this project with you so I’m doing a progress report now and as soon as the sun shows its face and I’m able to photograph the garden properly I’ll do the final reveal.

Check out the horrible wire fences that divide our gardens. Advice please!!
My husband really wanted to do this project himself, however, as he’d never built decking before and it was quite a big job that was made even more complicated by the sloping garden and the fact that it would be quite raised on one end, we decided to research local deck installers.
We use a local tradesman called Mervyn Northwood (his company is called Toolbox for anyone local to me) for all the home improvement jobs we can’t do ourselves. We used him for our bathroom makeover and our kitchen makeover so it was a no brainer when it came to the decking. He’s great at what he does, is very reliable and trustworthy, his rates are affordable and the quality of his workmanship is undeniable. Plus he’s just a really nice guy. He agreed to let my husband work with him so he could still be involved as much as possible.
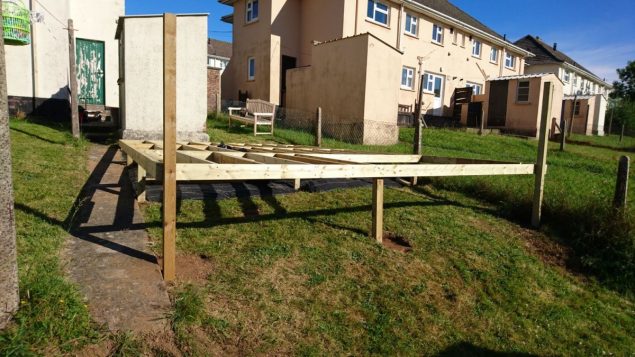
At the end of June, my husband dug all the holes for the posts and in early July Merv came and built the frame for us. (Massive thanks also to my dad for helping out while my husband was at work. If the sun ever does come back, you’ll be top of our BBQ guest list dad!).
We’re planning to sand and repaint that awful exterior door this summer too. And next year we will paint the outbuilding behind the decking too.
It was about now that it became apparent just how high the decking would be at one end. I knew it would be high but I wasn’t expecting it to be three foot off the ground. I started to panic that we would be floating high above all our neighbours and as we don’t have decent fences between our gardens I worried how this would look. I suppose we could have dug down and sunk the deck into the ground to avoid this height, but then we wouldn’t have got so much late evening sun or been able to benefit from those amazing valley views quite as much. As the project progressed, my mind was set at ease and I’m pleased we went for the higher option.

My husband lounging on the frame trying to imagine what it will be like when the decking is complete.
Just as we finished the frame, I was contacted by Richard Burbidge, a company that manufactures and supplies stair parts, decking and decorative mouldings. They wanted to know if I was working on any home improvement projects that they could get involved in. Talk about perfect timing!
Originally we were going to fabricate our own balustrade but we hadn’t even discussed how at this point. Luckily Richard Burbidge has a great selection of decking balustrade, to suit every possible style of deck. You can choose from six different types of baluster, infill panels and spindles in wood, metal or glass. There’s also three different newel styles and a choice of handrails.
I really love the look of their glass panel balustrade. It looks so cool and sleek. However, we already have a total lack of privacy so having a glass panel balustrade seemed like the wrong choice. Plus I think it’s a bit too contemporary for our home and would look quite out of place. So I narrowed down my options to three. I was torn between the Classic American, Classic Square and Traditional Square. Eventually, I settled on Classic Square and placed my order. A week later the components were delivered.

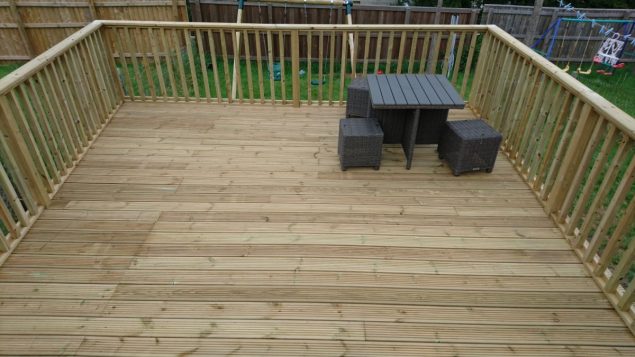
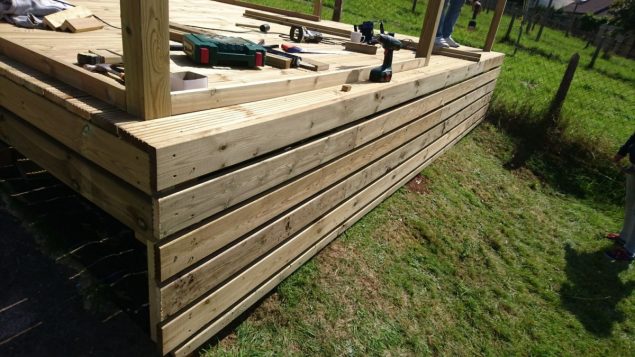
Merv fitted the newels and then my husband installed the majority of the decking boards. Once this was all in place the balustrade was fitted. All in all, the project was about a week’s worth of labour, but it took us just over a month to get it all done, partly because of the weather and partly due to scheduling. But I’m so relieved that it is now done. Both my husband and I keep looking out of the window and admiring the new deck and that beautiful balustrade.
The kids also love it! The evening we finished it they spent about half an hour running round in circles out there and screaming. It’s basically like a giant playpen in the garden. I might fit some stair gates on there next summer so we can keep them fully contained!
This post now gets quite picture heavy as I wanted to document the whole process.


There is still plenty of work to do on the garden. The door on the storage area under the stairs needs sanding and painting. The outbuilding needs to have its render fixed up and it needs painting too. I want to widen the garden path and maybe tile it next year as I don’t like the way it looks at the moment. And then there’s the fence!
If anyone has any more suggestions for the boundary fence between us and the neighbours please let me know. I was considering putting a big fence down either side but it’s just so windy here in Winter I think we’d be asking for trouble. The back fences have blown down two out of the past four years. We’d probably have to spend about £4-5k getting a fence installed that could withstand that wind. I’m now thinking about maybe replacing the wire fence with a pretty little picket fence. But any other suggestions most welcome!
Oh and let me know what you think of the decking of course.
Disclosure: This post has been written in collaboration with Richard Burbidge who supplied the balustrade to us free of charge. However, I want to stress that I only collaborate with brands and companies that I genuinely like and believe that my readers will like too.
You have shared very nice post full of interesting things.
I was looking for diy deck tutorial and then I found your website which is full of fantastic ideas.
Thanks for sharing this amazing post.
It looks lovely Stacey. Mervyn and Mr Design Sheppard have done a great job! Hopefully the sun will come back for a few weeks so you can really enjoy it for the rest of the summer. Also, how amazing is the view from your garden?
It’s looking great, it will be so nice to have somewhere to relax outside, if only this weather would play ball! x
I know Cate, it’s just so frustrating when we had such lovely weather a few months ago! Just trying to tell myself there will be many more summers to come!
Oh it’s looking great and those views are incredible!! The weather hasn’t been too great for us here either although I think we’re getting a little sun this weekend which will feel like a real treat after the last few weeks of grey! As for the fencing, I would also suggest concrete frames and wooden fencing. When we moved in we had really low fencing across both sides and hated it as there was simply NO privacy at all. After chatting to the neighbours, they were happy to use higher fencing across the sides so we all split the costs. We also planted Laurel on one side which after about 3-4 years grows so large and is such a lovely natural privacy screen. It’s also green all year round. Highly recommend that if you are looking for a more natural and cheaper ‘fencing’ option! You just need a little patience as it grows ;) xx
To be honest, the privacy isn’t really the main issue for me, all the properties to the right are empty anyway so we have no neighbours that side (at the moment) and we only have two neighbours on the left who we are really friendly with and end up chatting with when we are all out at the same time. The main reason I hate it is the look of those wire fences and the fact that they aren’t that safe for our girls as all the pointy bits are eye level for them. The grass grows up the wire too and looks all unkempt. I want something to make it look more well kept and loved. I also considered something a bit more open like trellis or lattice fencing which can be higher but that the wind can blow straight through. It’s such a tough decision!
Absolutely brilliant job hun! If you’re thinking of painting it I’d definitely do it on a warmer day before the cold sets in. We did ours in Winter and it almost freezes in a funny pattern. Most decking timber is pre-treated though so should last you until next year :) Gorgeous view you have there too! x
Thanks for the advice Karen, we are thinking of painting it. We’ll definitely try to get in done late August or early September. The views are the redeeming feature of the garden. We sat out there last night and watched the sun set behind the valley and it was just stunning. The light was amazing!
Looks wonderful. It’s such a nice feeling to be able to sit outdoors. Let’s hope for great weather now x
I think it will definitely change the way we use the space and make us spend more time outside, even when the weather is less than ideal. Last night I just got some blankets, cushions and sheep skins out and it was lovely!
It’s so frustrating re the weather. But it seems the sun is coming out later in the day so you might get lucky for some golden hour photos xxx
Typically it is a beautiful day today and I’m at work again! I need a sunshiny Saturday really!
that’s a big job! Looks great x
It was bigger than we thought actually Hannah and cost a whole lot more too. But definitely worth it!
Looks fabulous! Well done :)
I would try my luck with a sturdy tall wooden fence with concrete posts, I like my privacy too much!
Thanks for the suggestion Stephanie. I’d not considered concrete posts actually. That would definitely make it more sturdy!
Wow – it looks amazing. I can’t wait to see the finishing touches. #DevonBloggers
I’m dying to get out there with all the accessories I’ve been stock piling! Fingers crossed for good weather at the weekend!